February 25, 2019

SDR interface for the IC-R72

Follow the steps below to install the IFace card in the ICOM IC-R72. Installation is really very easy.

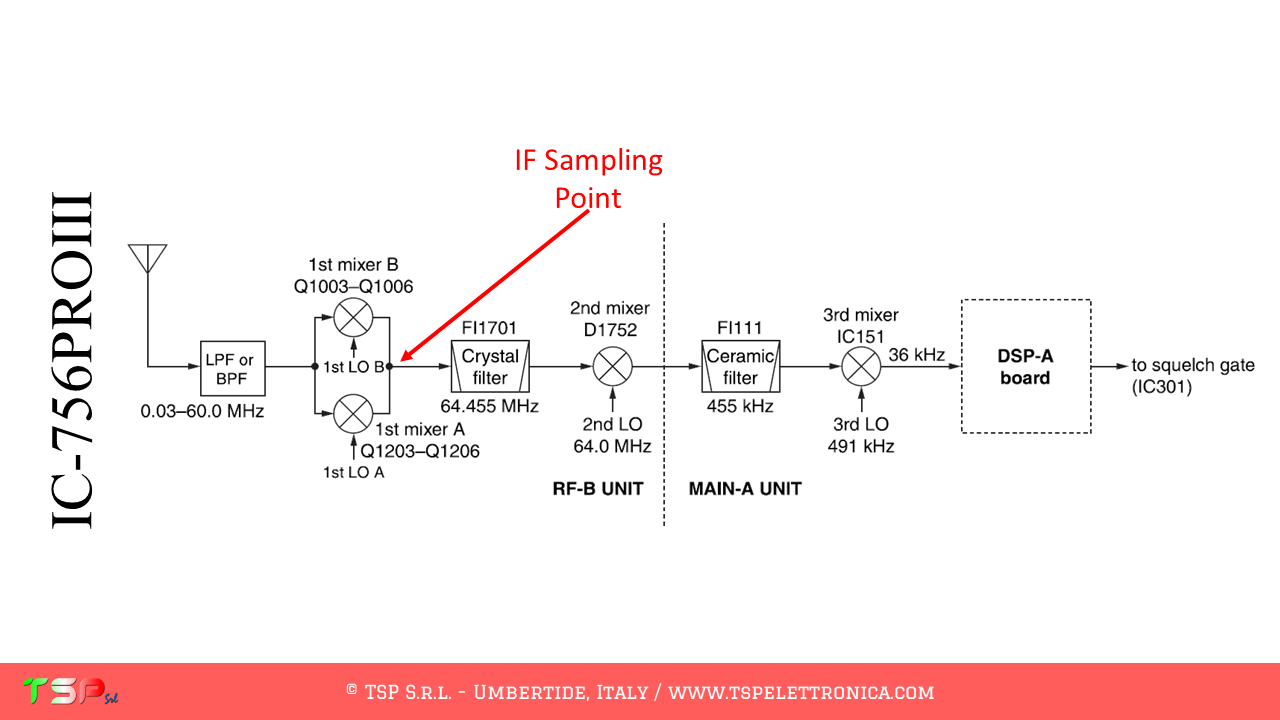
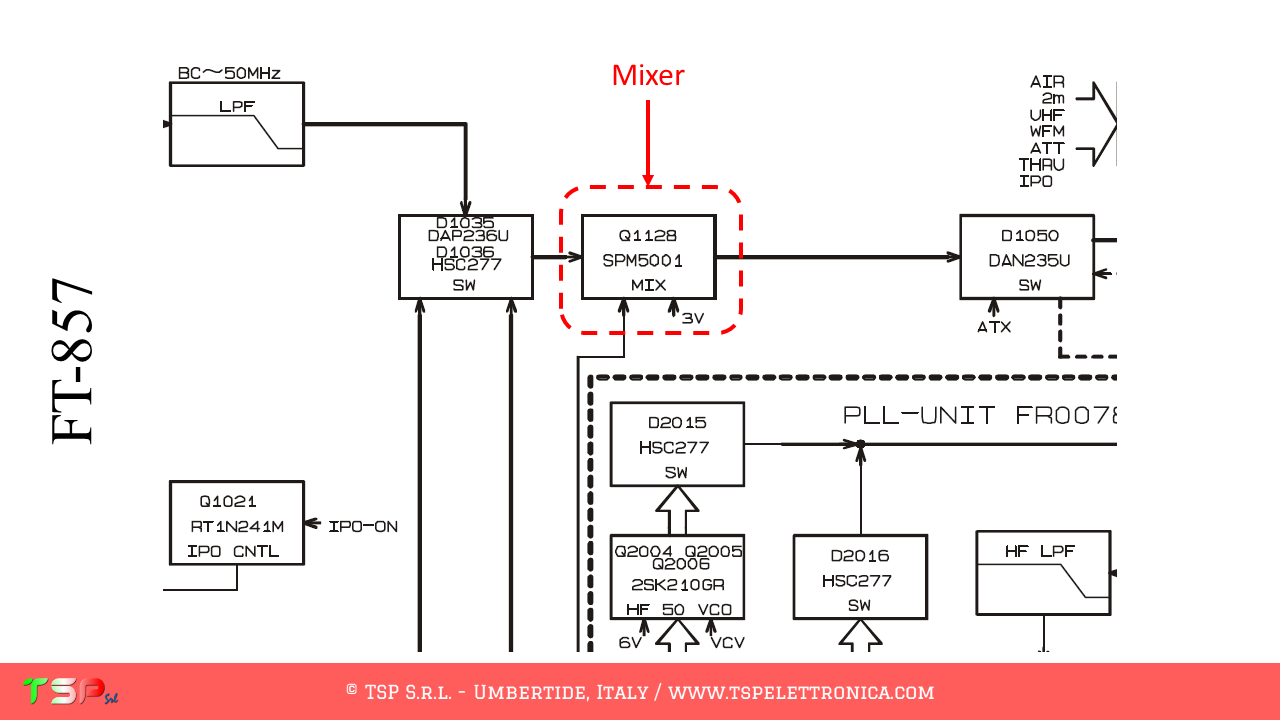
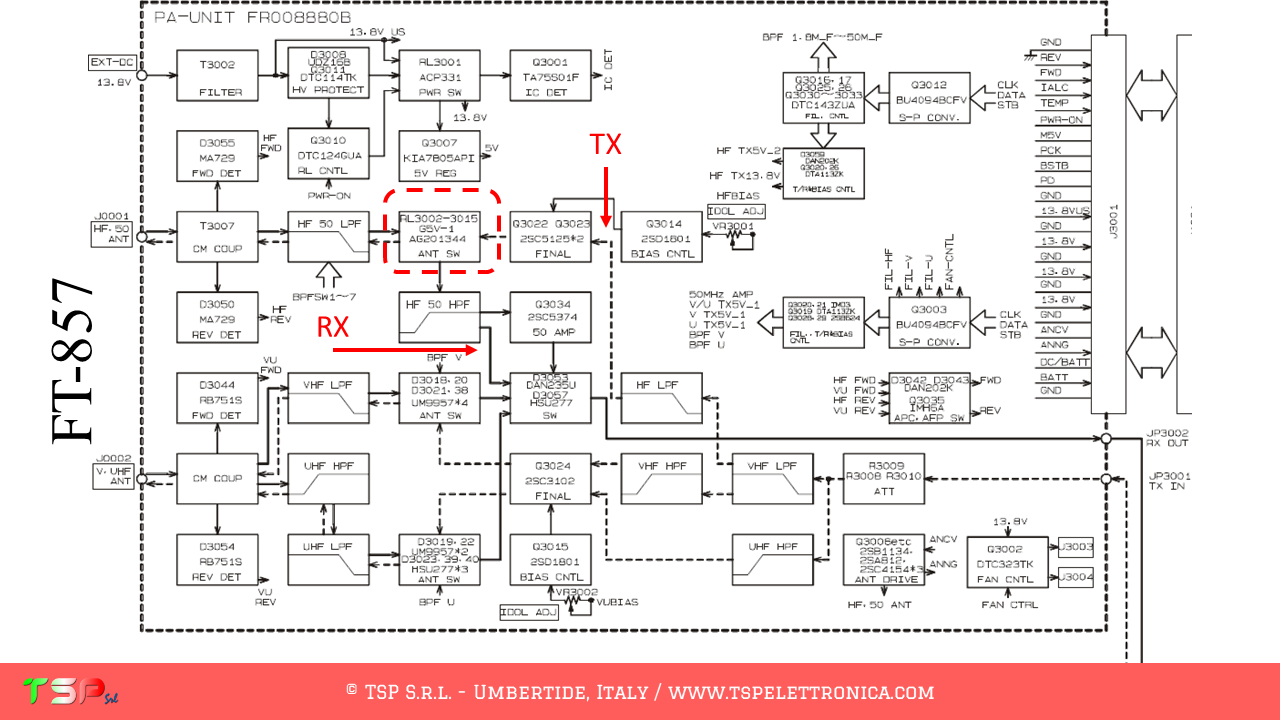
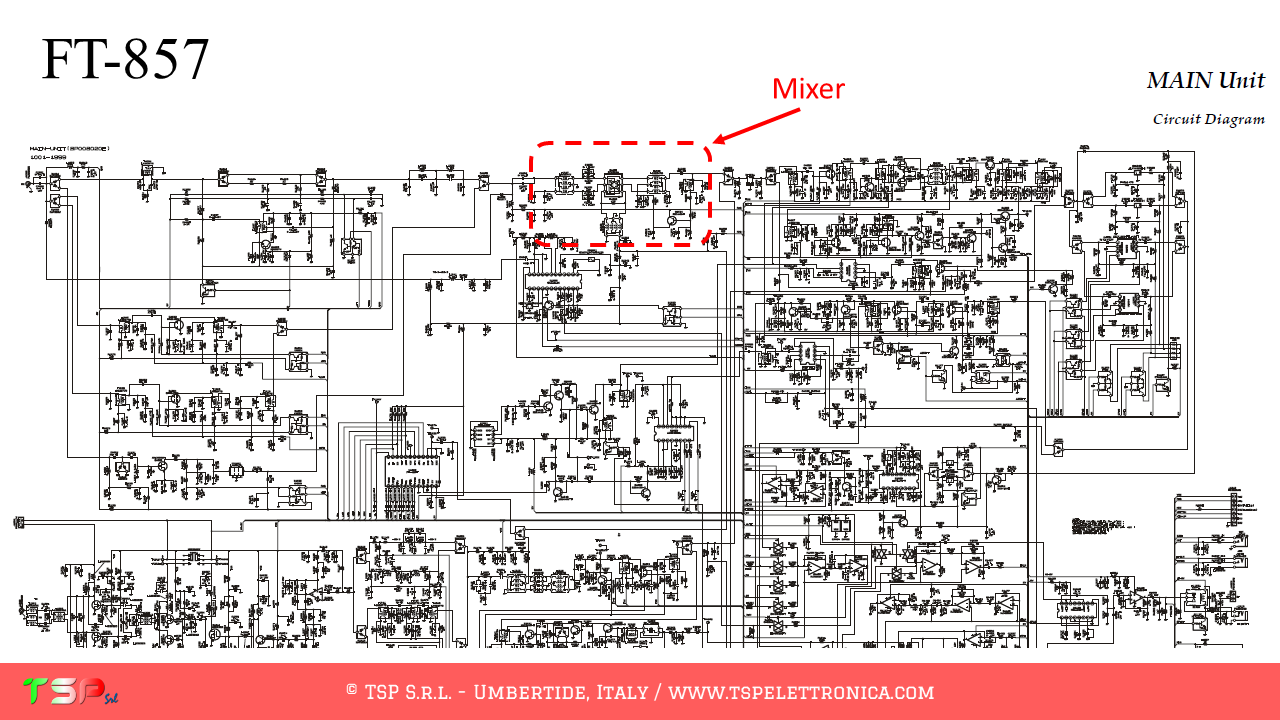
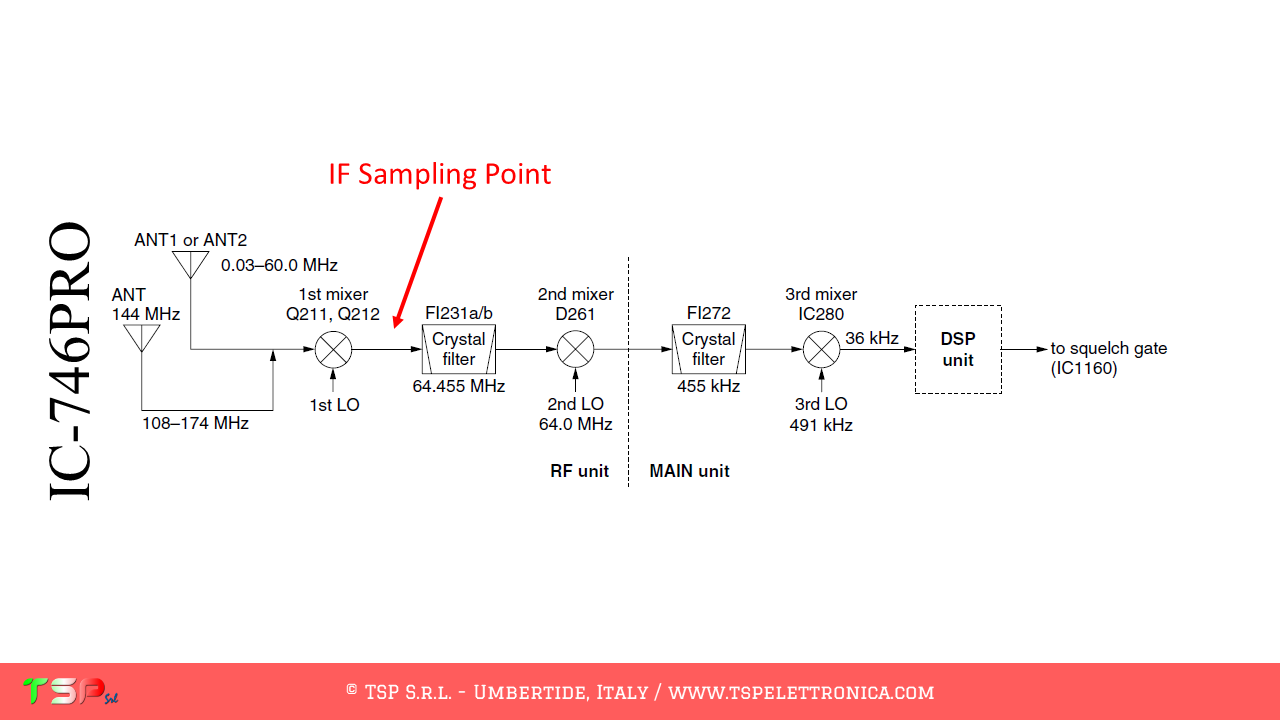
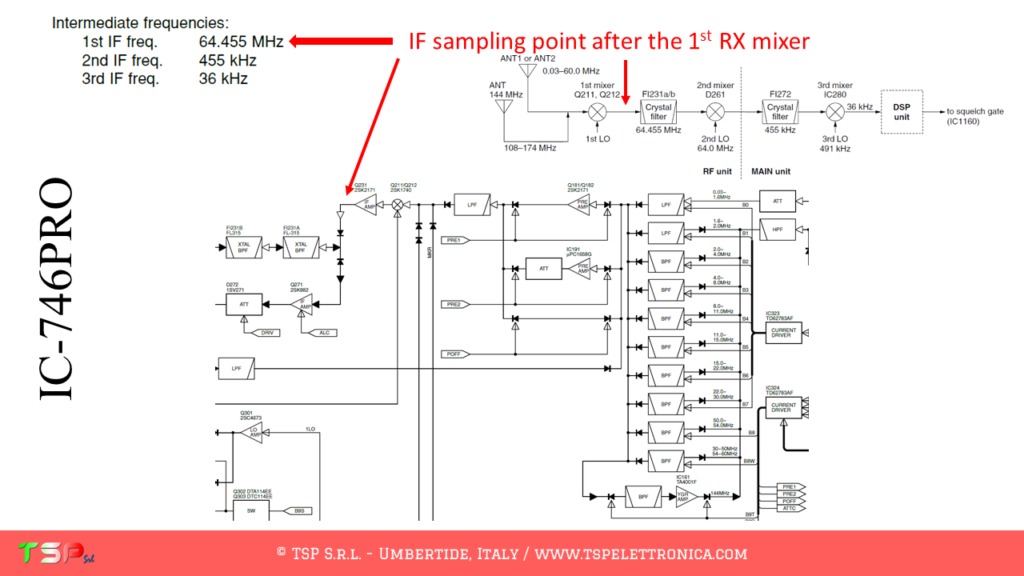
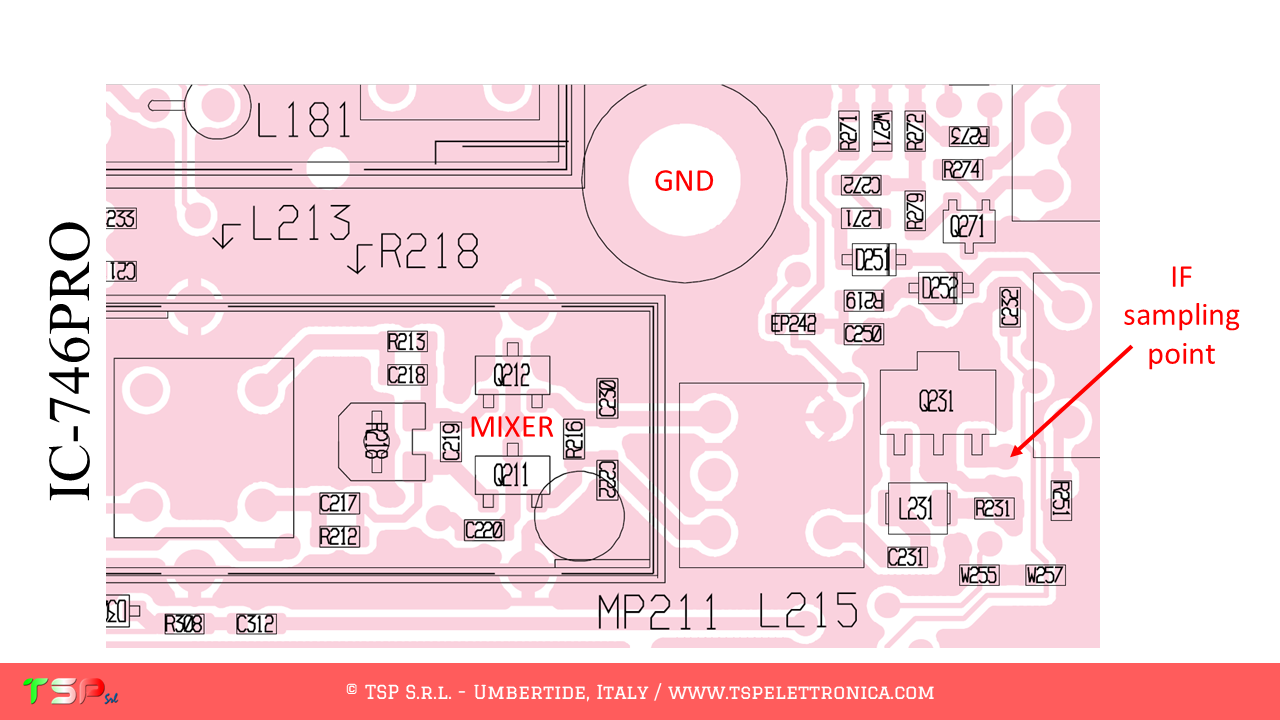
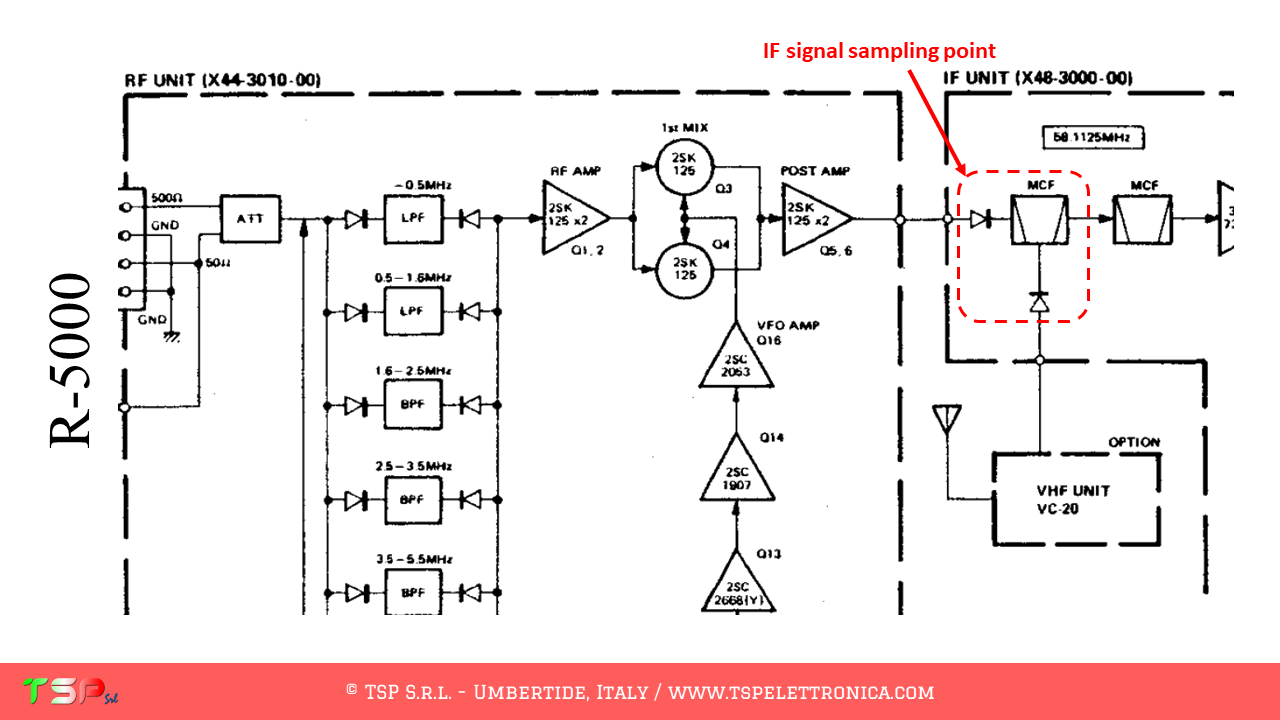
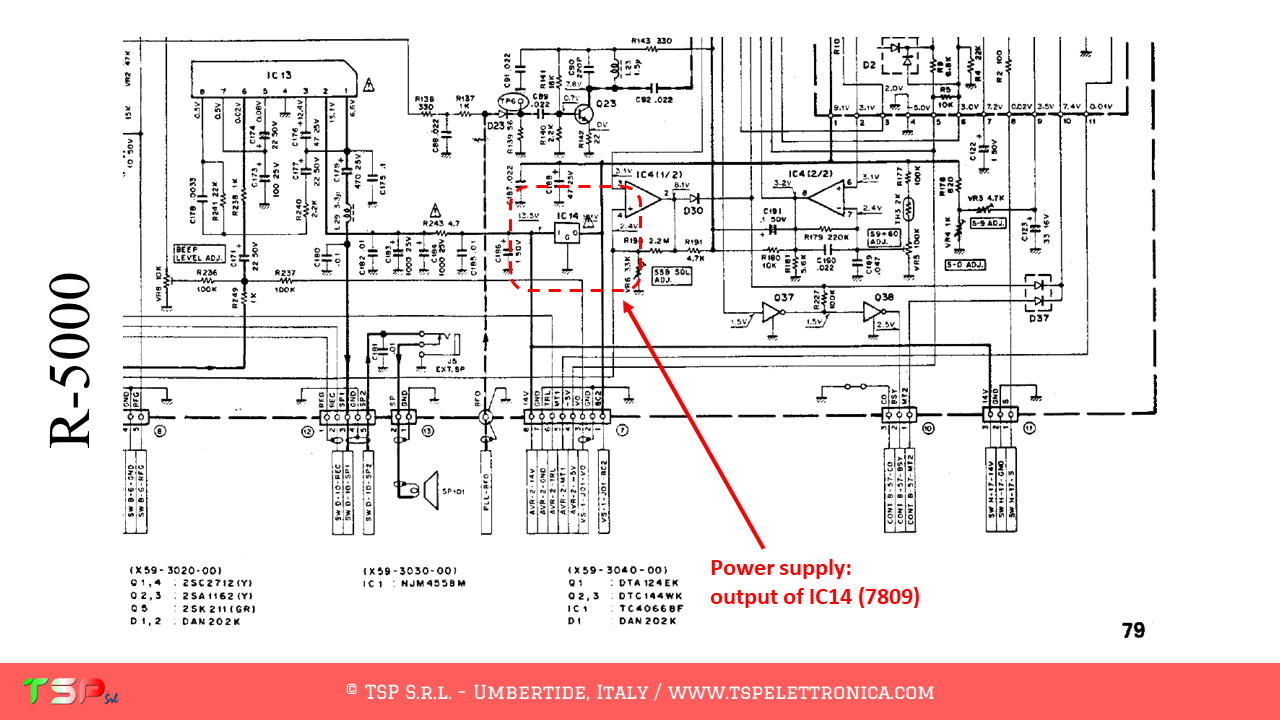
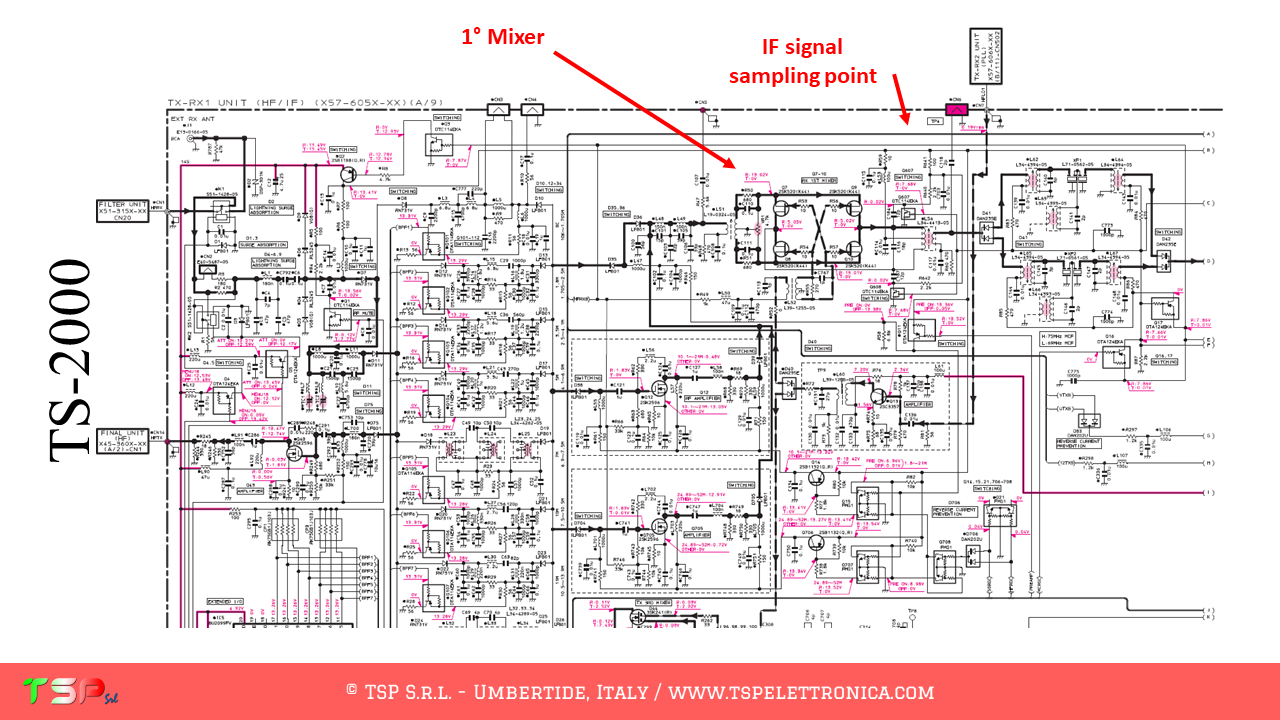
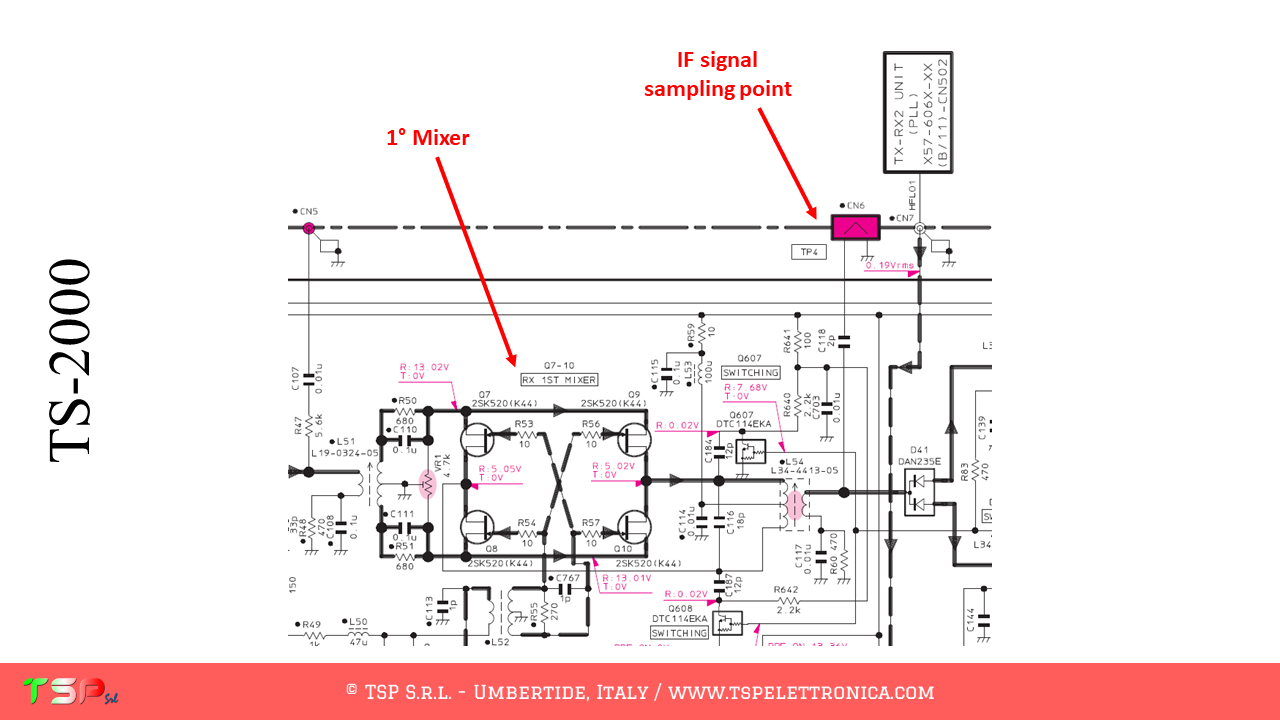
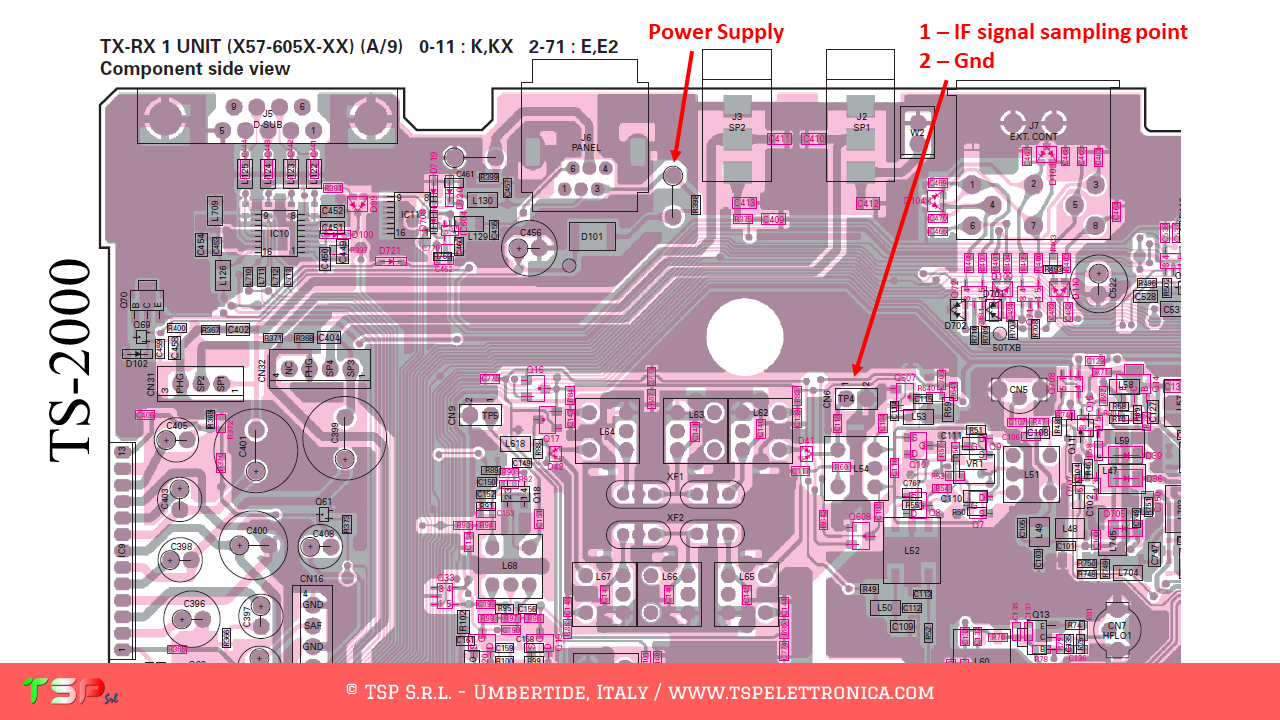
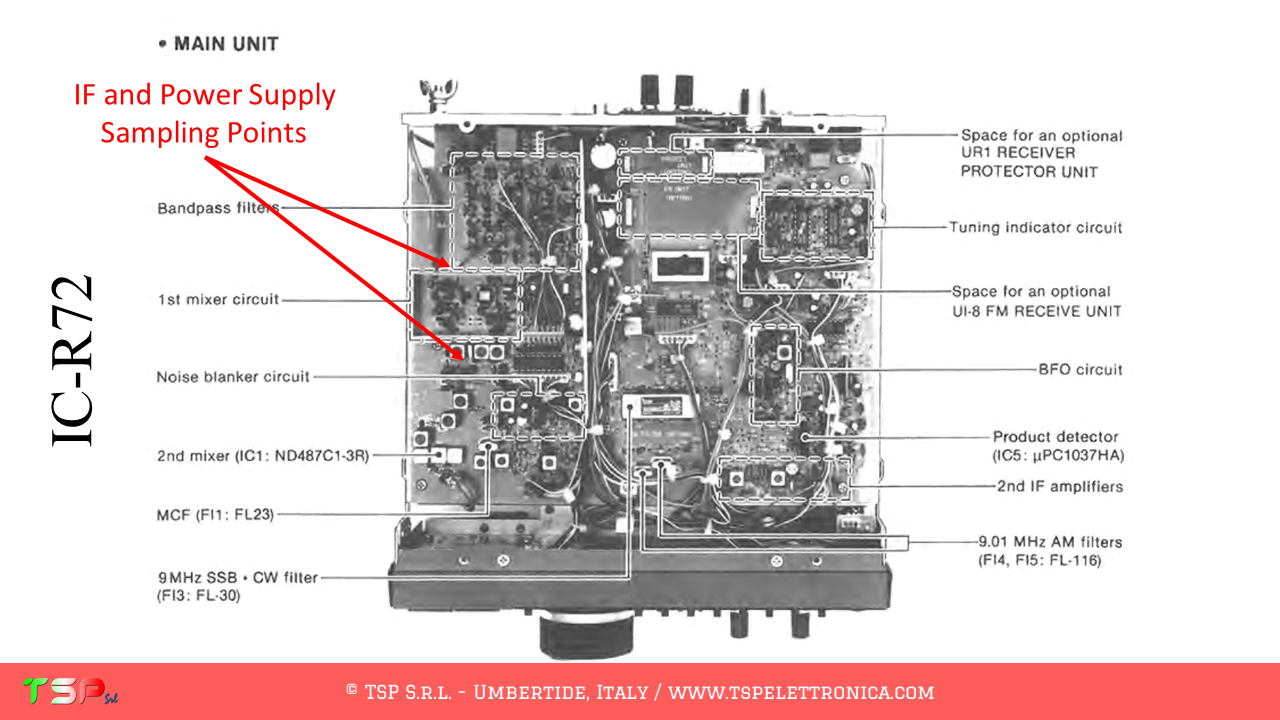
As always we start from the block diagram and try to find information on where to get the first intermediate frequency signal: we take the first because it is not filtered and the band is still wide. The following images make it very clear where this point is located (on resistance R82). Being a receiver, there is no need to look for the PTT signal. The power supply can be taken between the inductance L66 and the resistance R68.

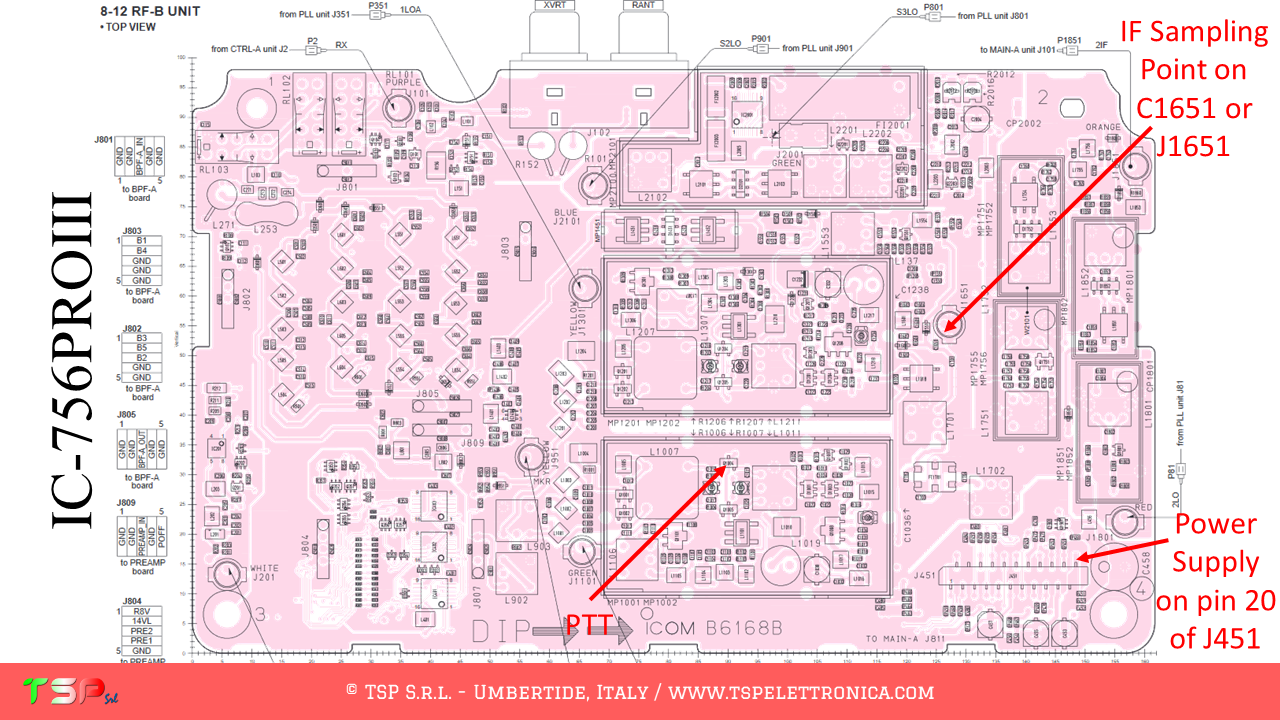
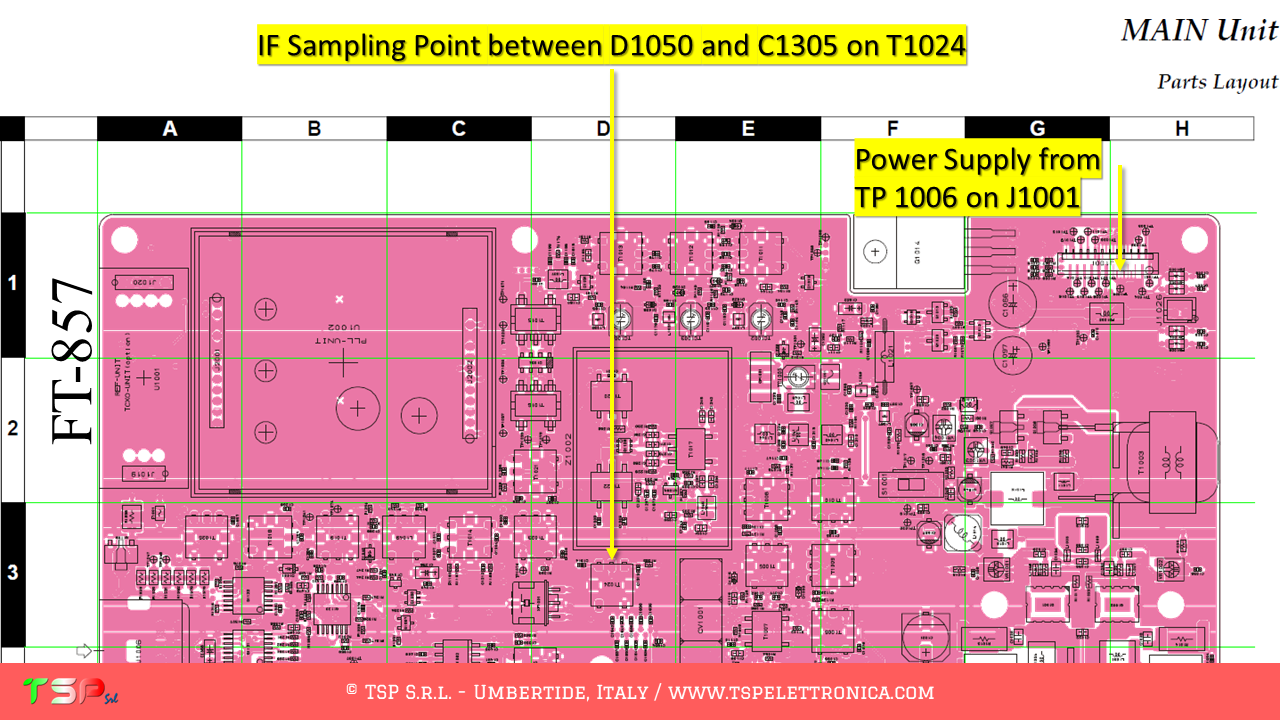
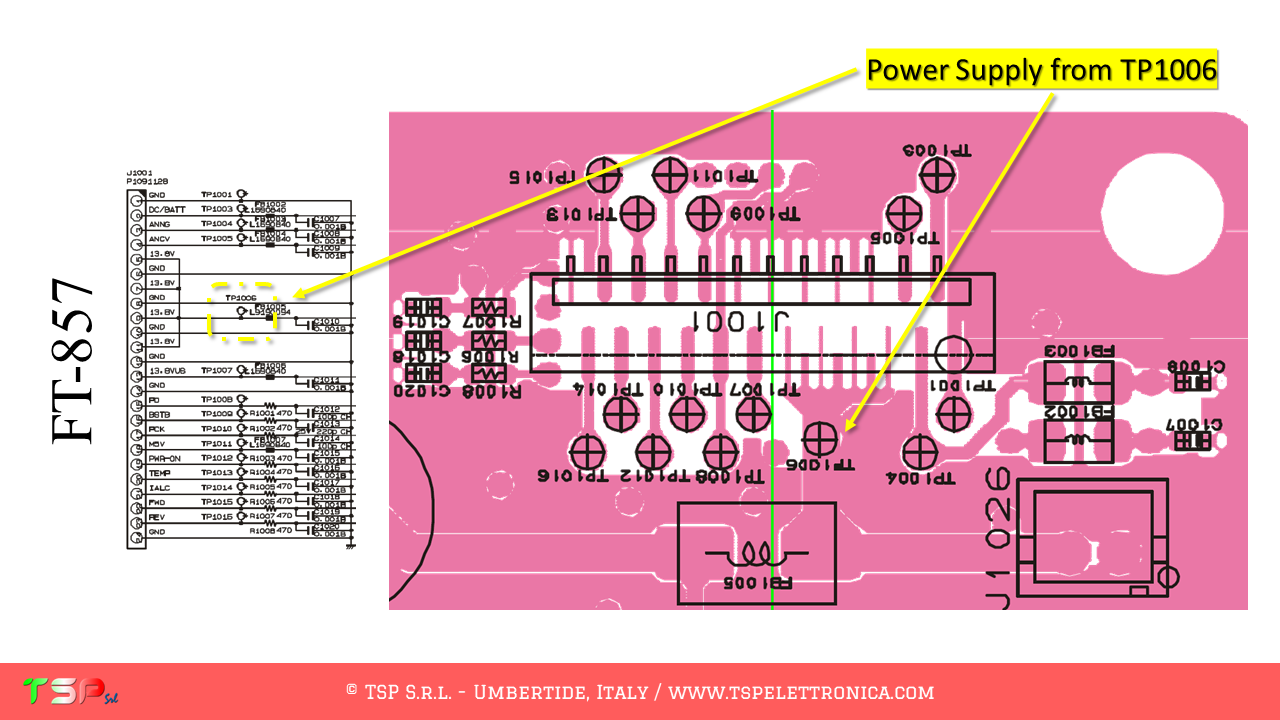
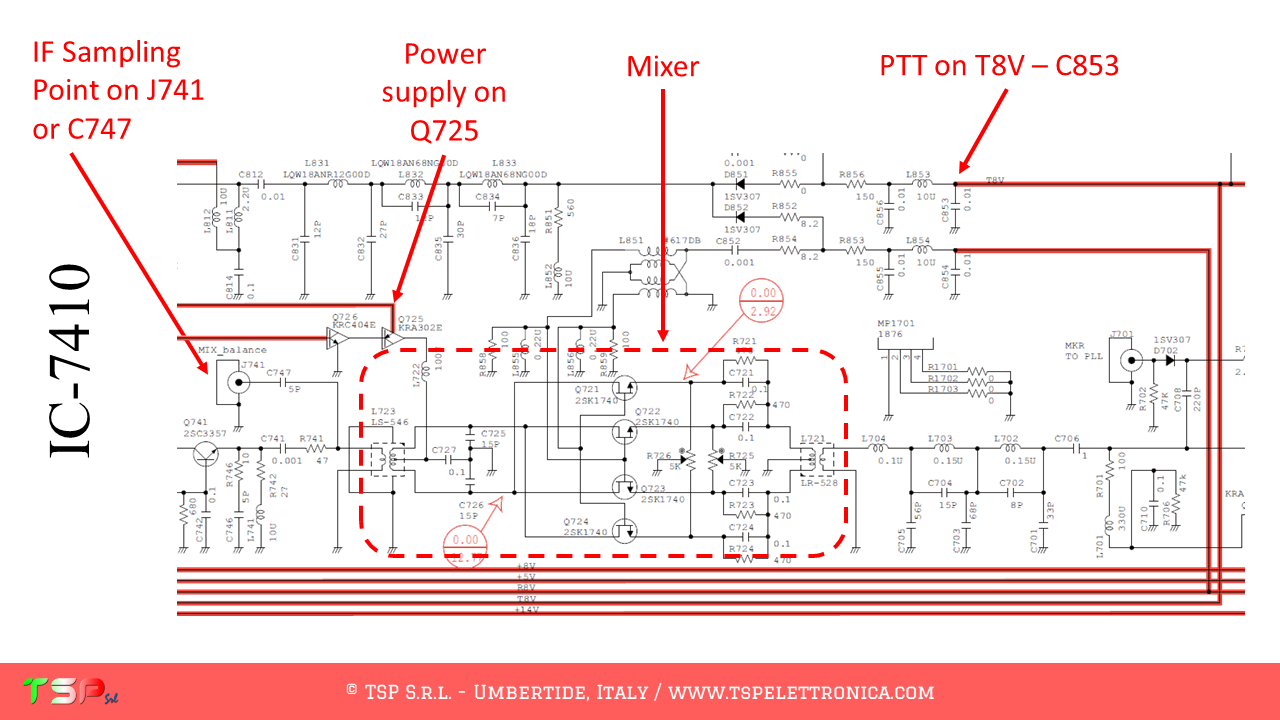
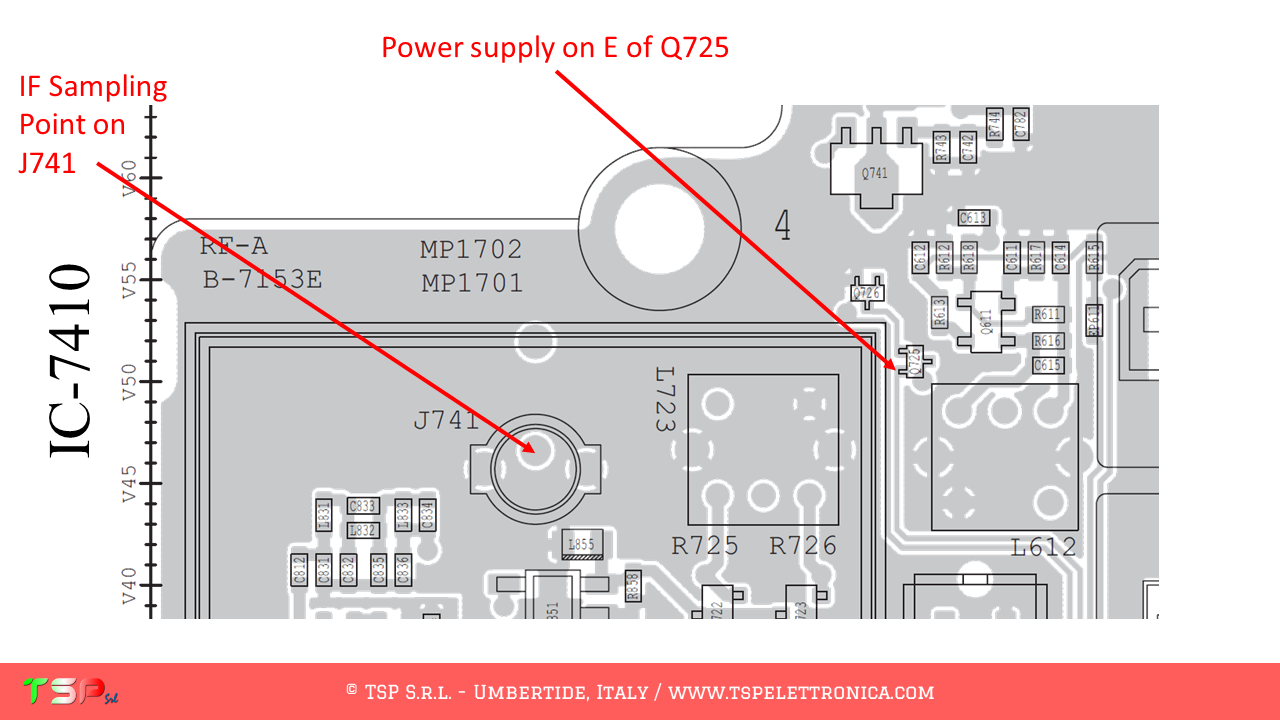
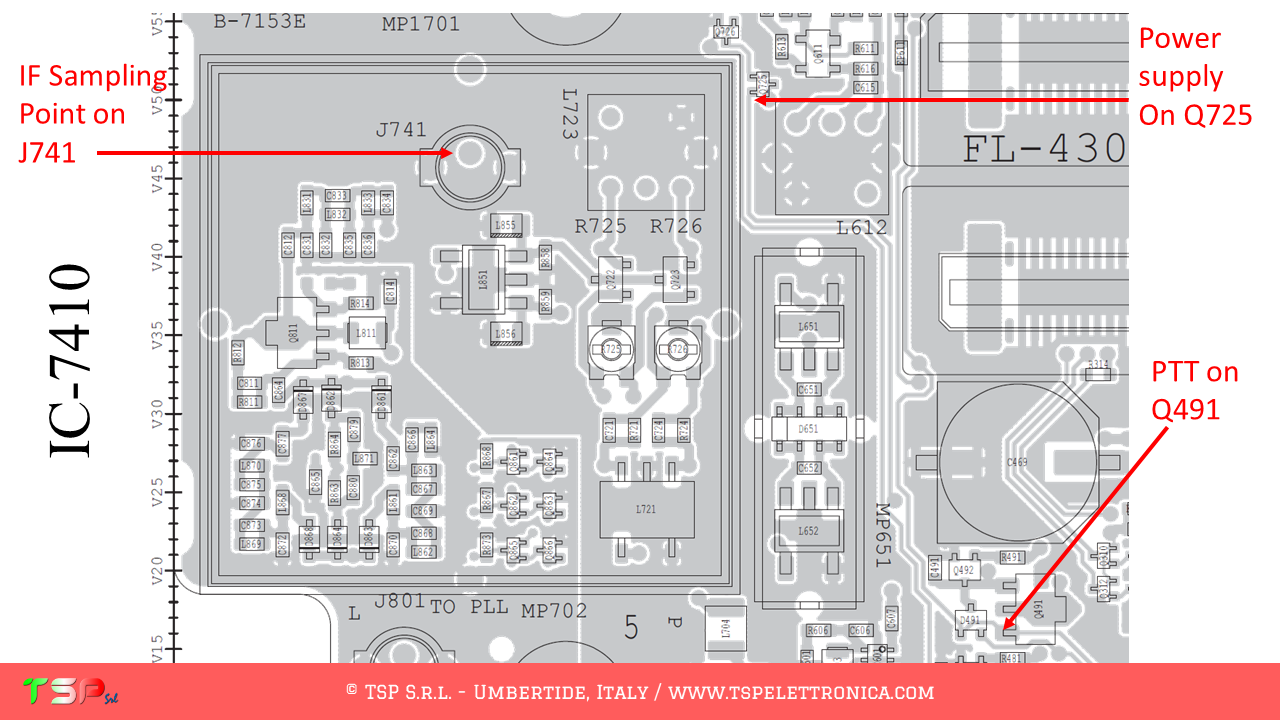
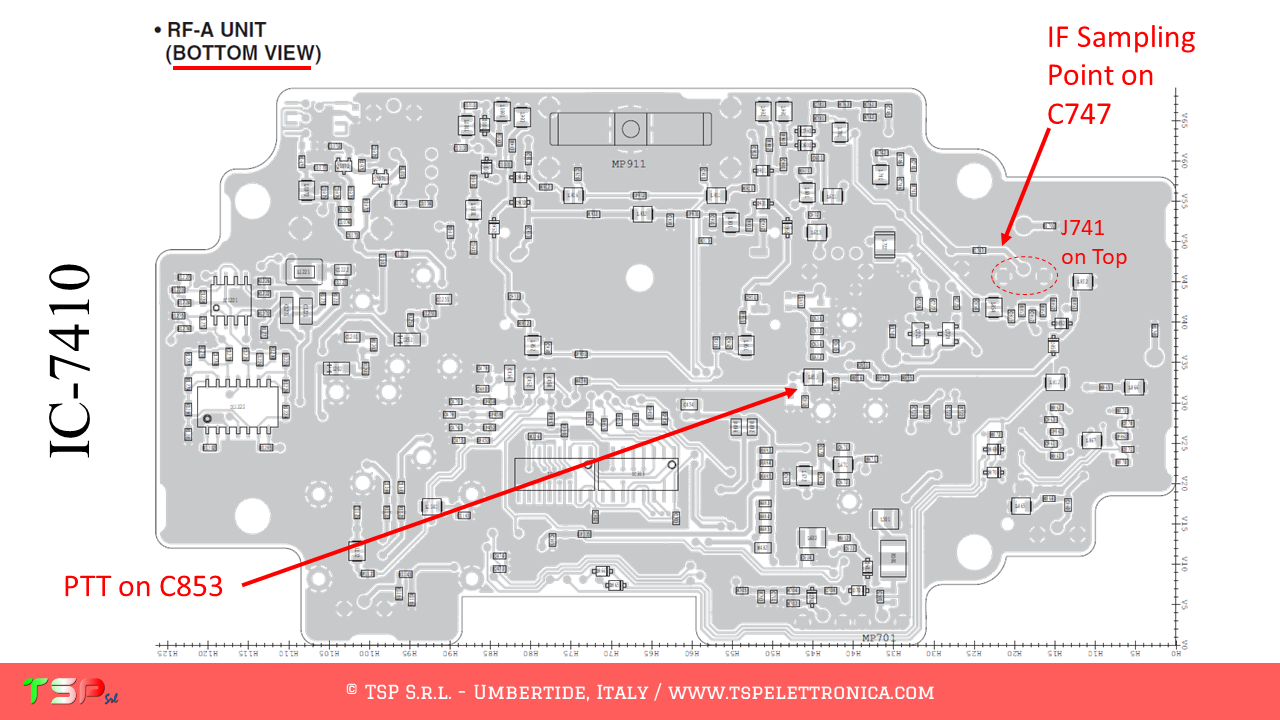
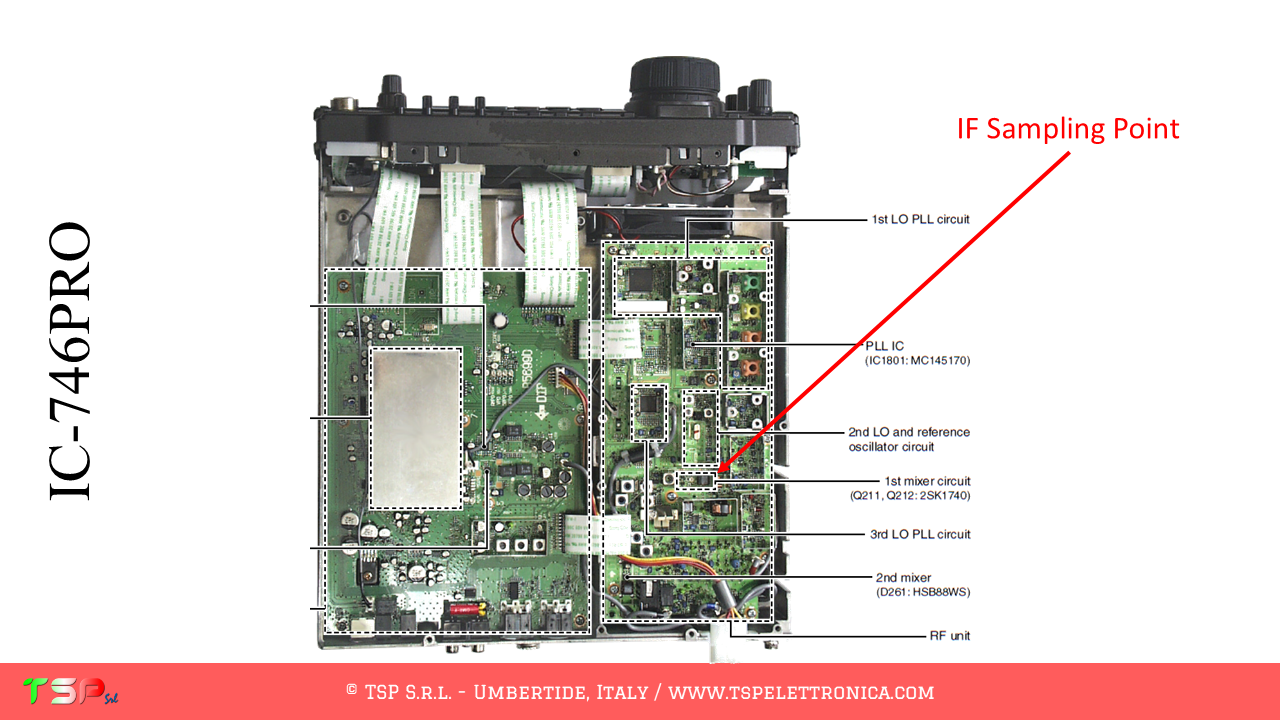
At this point all that remains is to identify the points on the PCB where to take the signals: refer to the following images.

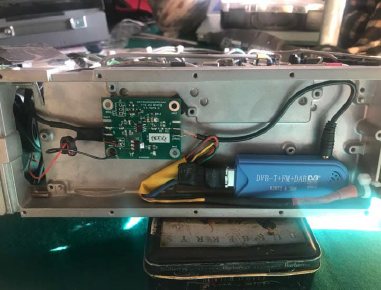
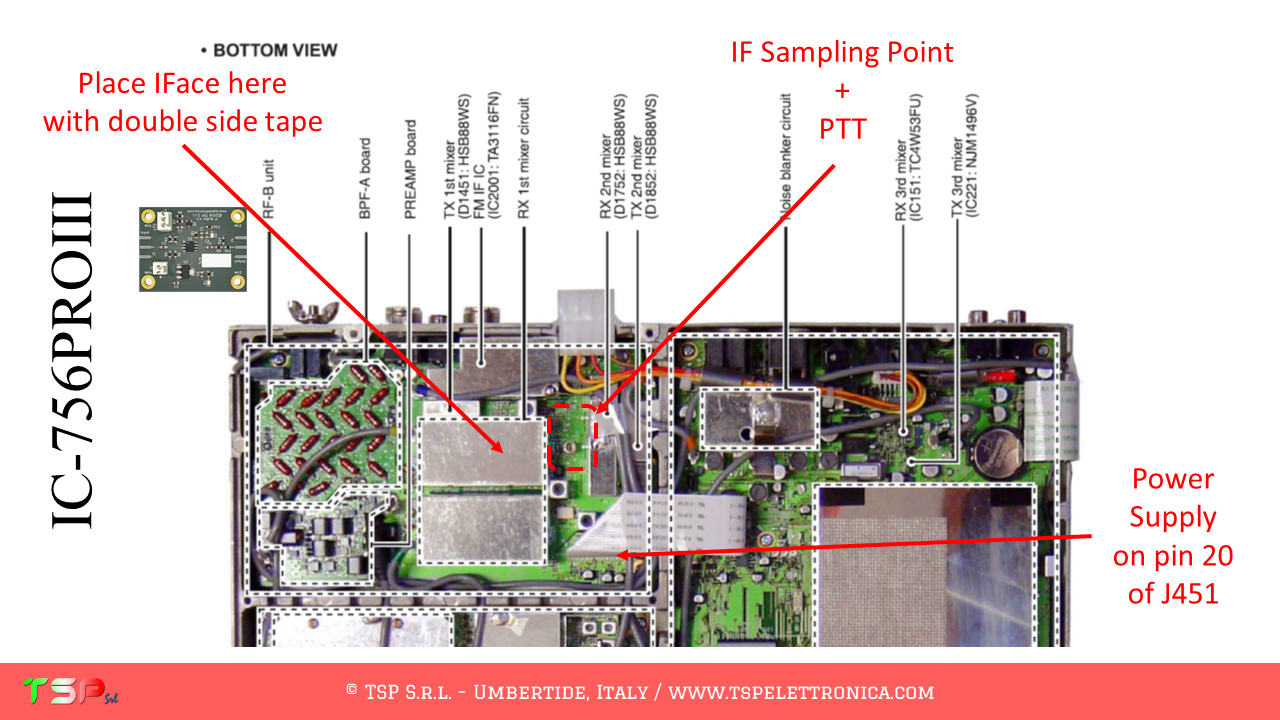
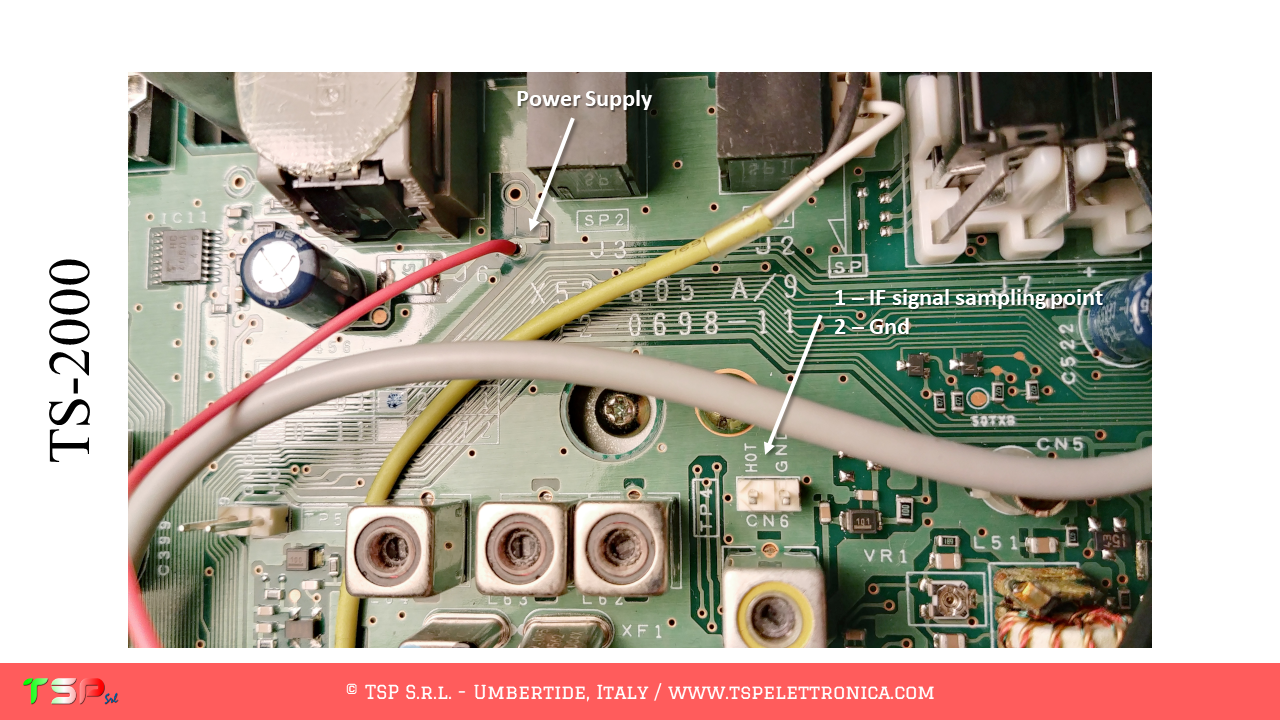
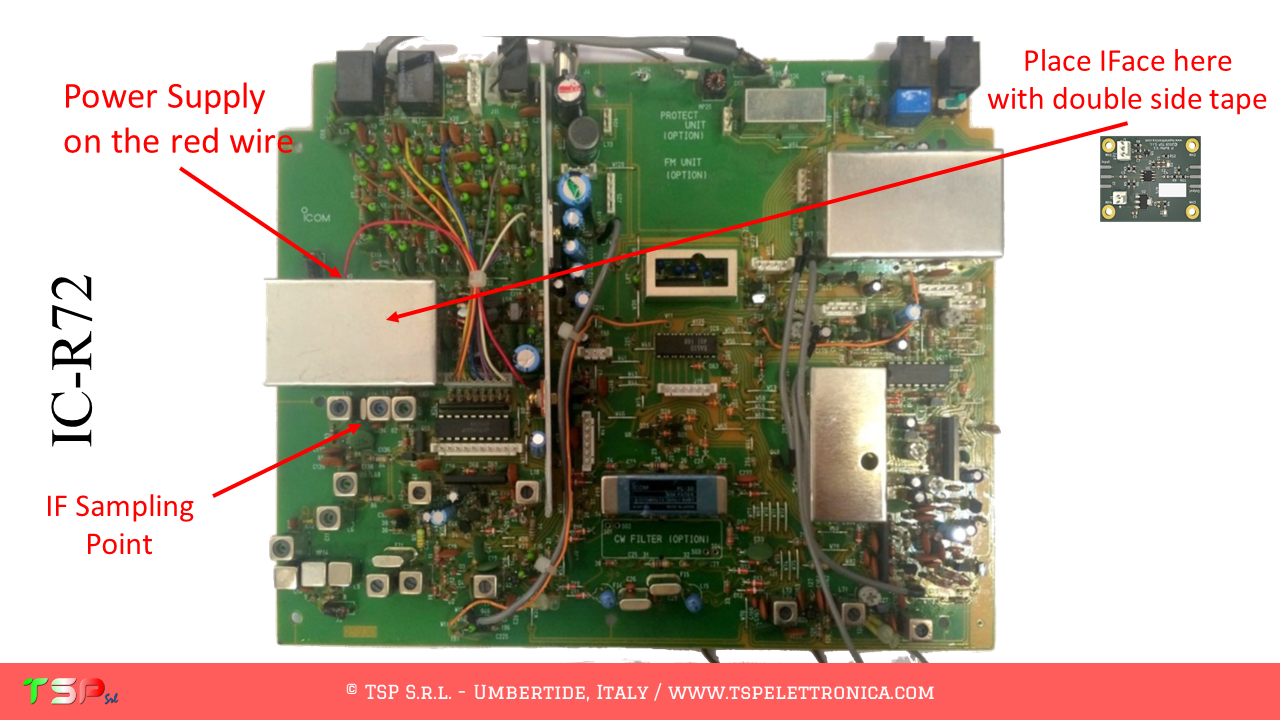
Finally, this photo suggests where to place the IFace card and where to get the signals.

If you are convinced of the goodness of the proposal buy an IFace using the button below.

WARNING: Although the installation of IFace is not difficult, it is done at your own risk. TSP S.r.l. is not responsible for any damage, unwanted side effects or anything else.

For more information do not exist to write to us.
Have fun!

TS-2000SDR: new testimonial!

Our client Alberto IK0ZTL just sent us a nice testimonial on how he used our IFace card to add an SDR receiver to his nice TS-2000.

He did a great job by inserting everything into the radio, including the RTL-SDR converter, so that he only had the USB cable out to connect to the computer.

Find all the nice work described in a PDF to download right below.

Instead, to buy an IFace, use this following button.

Good reading, congratulations to Alberto and good listening with SDR technology.

SDR interface for the IC-756PROIII

These are the instructions to install the IFace interface inside of the Icom IC-756PROIII. The installation is very easy.

The IC-756PROIII, as well as other radios, has a fairly complex configuration and uses three different intermediate frequencies. We are interested in the first, the “wide band” one, the first one of the main band pass filter (the roofing filter so to speak). Below is a video with the sequence of operations to be performed to obtain a sufficient bandwidth to make a panoramic receiver around the chosen IF frequency. Going over you can find some images that illustrate how to install the interface for SDR.

The following image shows the point where the IF signal will be taken. The first IF frequency is 64.455 MHz.

Let’s start by analyzing the wiring diagram. We have to find the first mixer, the PTT and where to take the power supply. From the following images everything will appear clear.

At this point we have to locate the points where we connect the electric cables to the IFace. The following images show where to take the various signals.

This last image shows the inside of the RTX and where the IFace interface is to be placed.

To buy an IFace please one of the buttons below.

ATTENTION: Though installing the IFace is not difficult, you do this at your own risk. TSP S.r.l. is not responsible for any damage, unwanted side-effects or whatever.

For more information do not hesitate to write us.
Have fun!

Installing the IFace inside the FT-857D

These are the instructions to install the IFace interface inside of the Yaesu FT-857D. The installation is very easy.

The FT-857D, as well as other radios, has a fairly complex configuration and uses different intermediate frequencies. We are interested in the first, the “wide band” one, the first one of the main band pass filter (the roofing filter so to speak). The one described here is therefore the sequence of operations to be performed to obtain a bandwidth sufficient to make a panoramic receiver around the selected IF frequency. The following image shows the point where the IF signal will be taken.

The PTT control is not required because different paths are used for the TX and the RX signals.

Let’s start by analyzing the wiring diagram. We have to find the first mixer and where to take the power supply. From the following images everything will appear clear.

At this point we have to locate the points where we connect the electric cables to the IFace. The following images show where to take the various signals.

The output signal cable can simply through one of the ventilation holes as depicted here below.

Paypal

ATTENTION: Though installing the IFace is not difficult, you do this at your own risk. TSP S.r.l. is not responsible for any damage, unwanted side-effects or whatever.

For more information do not hesitate to write us.
Have fun!

Installing the IFace inside the IC-7410

These are the instructions to install the IFace interface inside of the Icom IC-7410. The installation is very easy.

The IC-7410, as well as other radios, has a fairly complex configuration and uses different intermediate frequencies. We are interested in the first, the “wide band” one, the first one of the main band pass filter (the roofing filter so to speak). The one described here is therefore the sequence of operations to be performed to obtain a bandwidth sufficient to make a panoramic receiver around the selected IF frequency. The following image shows the point where the IF signal will be taken.

Let’s start by analyzing the wiring diagram. We have to find the first mixer, the PTT and where to take the power supply. From the following images everything will appear clear.

At this point we have to locate the points where we connect the electric cables to the IFace. The following images show where to take the various signals.

ATTENTION: Though installing the IFace is not difficult, you do this at your own risk. TSP S.r.l. is not responsible for any damage, unwanted side-effects or whatever.

For more information do not hesitate to write us.
Have fun!

Installing the IFace inside the IC-746PRO

These are the instructions to install the IFace interface inside of the Icom IC-746PRO. The installation is very easy.

The IC-746PRO, as well as other radios, has a fairly complex configuration and uses different intermediate frequencies. We are interested in the first, the “wide band” one, the first one of the main band pass filter (the roofing filter so to speak). The one described here is therefore the sequence of operations to be performed to obtain a bandwidth sufficient to make a panoramic receiver around the selected IF frequency. The following images show the point where the IF signal will be taken.

Let’s start by analyzing the wiring diagram. We have to find the first mixer, the PTT and where to take the power supply. From the following images everything will appear clear.

At this point we have to locate the points where we connect the electric cables to the IFace. The following images show where to take the various signals.

Below is shown the card affected by the mods. It will not be difficult to make the required small welds, space is not lacking.

In order to buy one or more IFace please use the following buttons.

ATTENTION: Though installing the IFace is not difficult, you do this at your own risk. TSP S.r.l. is not responsible for any damage, unwanted side-effects or whatever.

For more information do not hesitate to write us.
Have fun!

Installing IFace inside the R-5000

This page shows how to install the IFace in the Kenwood R-5000. Being a receiver we will not have to use the PTT signal, so the installation will be even easier.

The R-5000 uses different intermediate frequencies depending on the band on which it is operating (HF or VHF) but there is a common one, 58.1125 MHz. The one described here is the sequence of operations to be performed to obtain the signal to be sent to the external SDR receiver and shows where to connect the power and signal pickup wires.

The following images show the block diagram of the radio and the point where to take the IF signal.

Let’s analyze the wiring diagram to find the exact point where to take the IF signal and the power supply for IFace.

The following image shows where the signals relative to the IF and to the supply voltage are located.

This last image helps to identify the points where to take the IF and the power supply.

With the coaxial coaxial cable supplied in the kit, the IF signal goes from the IFace to the external SDR receiver.

In order to buy an IFace, please use the following buttons.

ATTENTION: Though installing the IFace is not difficult, you do this at your own risk. TSP S.r.l. is not responsible for any damage, unwanted side-effects or whatever.

For more information do not hesitate to write us.
Have fun!

Installing IFace inside the TS-2000

These are the instructions to install the IFace interface inside of the Kenwood TS-2000. The installation is very easy.

The result you can obtain is well shown in the following video.

The TS-2000, as well as other radios, has a fairly complex configuration and uses different intermediate frequencies depending on the band on which it is operating. In any case, the one described here is the sequence of operations to be done to obtain sufficient bandwidth to make a panoramic receiver around the selected IF frequency. For this reason we opt for the first average frequency and before the roofing filter (or intermediate frequency filter).
The following image shows the point where the IF signal will be taken for reception in the HF / 50 MHz band.

  • The point where you can take the IF signal can be more precisely identified by means of the wiring diagram as shown in the following images. We can use the CN6 connector (pay attention to the polarity). The electronic card of interest is the one called TX-RX1 and is located on the bottom side of the radio.
  • Now we have to look for the point where to draw the power supply. In the lower part of the TX-RX1 diagram on the left is the “PANEL” connector. Nearby is the resistance R398: at the ends of this it is possible to take the voltage with which to feed the IFace. These components are physically located near the CN6 connector from which the IF signal is taken.
  • PTT: for the TS-2000 it is not required because the reception circuit is automatically muted (MUTE) during transmission.
  • In the following pictures you can see how close to each other are the points where to take the IF signal and the power supply: the installation is therefore really simple.

You can buy IFace 2 using the buttons below.

ATTENTION: Though installing the IFace is not difficult, you do this at your own risk. TSP S.r.l. is not responsible for any damage, unwanted side-effects or whatever.

For more information do not hesitate to write us.
Have fun!

© TSP S.r.l. | VAT IT03137540542 | V.le Unità d'Italia 36, 06019 Umbertide, ITALY

NEWS July 18, 2024
A Telegram group is now available through which you can interact to get faster responses from other customers or, if necessary, from TSP Srl. Sign up for free by clicking here: Telegram TSP Customers. Please limit the use of contact forms to send generic requests, they have low reading priority because they are often used to send spam.

NOVITA' 18 Luglio 2024
E' da oggi disponibile un gruppo Telegram tramite il quale interagire per avere risposte più veloci da altri clienti o, in caso, da TSP Srl. Iscrivetevi gratuitamente facendo click qui: Telegram Clienti TSP. Per favore limitare l'utilizzo dei form di contatto per inviare richieste generiche, hanno bassa priorità di lettura perché spesso usati per inviare spam.
This is default text for notification bar